Spring Boot is been created for Rapid development. In this article will go through the steps to create first basic REST API using Spring Boot. We will see the more advanced version of this application in upcoming articles on microservices.
Prerequisite:
1. Maven 3.X
2. Java 1.8/1.7
Getting Started – Step by Step guide
The best way to bootstrap your Spring Boot projects is to use Spring Initializr
It allows you to bootstrap various type of Spring Boot application from a simple web UI. You can select various available libraries from UI as per your requirement.
There are various option to generate, you can choose from Maven/Gradle project, with Java/Kotlin/Groovy and appropriate spring boot version. We will be using Maven, Java and Spring Boot 2.0.0 here.
Define group, artifact, name & description of the application on the UI.
Click on “Switch to the full version” at the bottom left to see the list all available library options to be included in the project. For this article, I have selected the following as this is just a basic article to get started with Spring Boot.
Web:
-Web
-Jersey(JAX-RS)
Ops:
-Actuator
Click on “Generate Project” button at the bottom of the screen to download bootstrap project with Spring Boot.

Spring Initializr- Spring Boot, bootstrap your first REST API application
Import the project in your favorite IDE – Eclipse, IntelliJ Idea, STS or any other. I am using IntelliJ Idea on Mac OSX.
Project Structure will look like as follows:
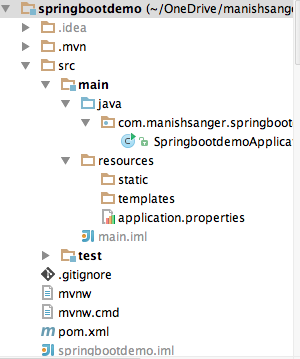
Spring boot – REST API project structure
Here is pom.xml dependencies, downloaded from Spring Initializr.
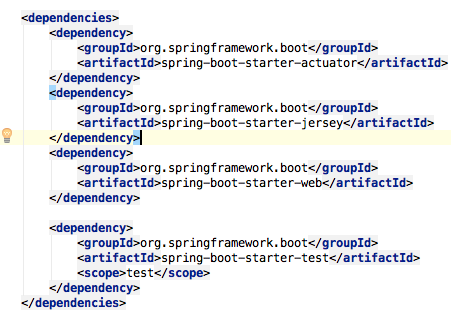
Spring Boot REST API – maven dependencies
spring-boot-starter-web – Starter for building web, including RESTful, applications using Spring MVC. Uses Tomcat as the default embedded container.
spring-boot-starter-actuator – Actuator provides production readiness of the application by monitoring our application, gathering metrics, understanding traffic, state of database etc. Will see actuator in more details in my next article.
Here is the Application file, which has the main method to run the Spring Boot application to make it executable:
@SpringBootApplication

public class SpringbootdemoApplication {

public static void main(String[] args) {

SpringApplication.run(SpringbootdemoApplication.class, args);

}

}
Create a Rest Controller, to create your first REST endpoint. Here is the code:
@RestController

@RequestMapping(value = "/", produces = MediaType.APPLICATION_JSON_VALUE)

public class HelloController {
@RequestMapping("/")

public ResponseEntity<Response<List>> index() {

HttpHeaders headers = new HttpHeaders();

List listData = new ArrayList<>();

listData.add("This is a First REST API with Spring boot");

listData.add("Test2");
return new ResponseEntity<>(new Response<>(HttpStatus.OK.value(),

"First Spring Boot REST API is working", listData), HttpStatus.OK);

}

}
I create a class named Response to convert data to JSON and define a proper response format. This is not required, but I always prefer to have a class like this as it easy to format/standardize your response and pass HTTP status code &message to variety of API consumers.
@JsonInclude(value = Include.NON_EMPTY)

public class Response {
private int status;

private String message;

private T data;
public Response(int status, String message, T data) {

super();

this.status = status;

this.message = message;

this.data = data;

}
public Response() {

super();

}
public int getStatus() {

return status;

}
public String getMessage() {

return message;

}
public T getData() {

return data;

}

}
You can also use lombok project (https://projectlombok.org/), if you don’t want to write/generate getters & setters.
That’s it, now we are ready to launch our first sample Spring Boot REST API project.
Go to Terminal and use the following commands to run the application.
mvn clean install

java -jar springbootdemo-0.0.1-SNAPSHOT.jar
You can also run from your IDE. I am using IntelliJ Idea, so I can run it from IDE itself.
Once the run is complete, you can access it on http://localhost:8080/ or via postman. We haven’t made any configuration changes to it will run on localhost and default port 8080.
Here is the response:
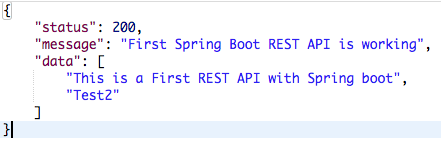
Spring Boot – REST API Response
You can access Actuator Health and Info as follows:
http://localhost:8080/actuator/health
http://localhost:8080/actuator/info